Machinists commonly use machine tool fixtures in machining. Traditional fixture design provides detailed information and mature experience for reference.
CNC milling machines and machining centers have widely improved processing efficiency, precision, and workpiece adaptability, significantly transforming traditional machining.
But in the file, the CNC milling machine and machining center fixture design content is very little.
This paper explores fixture design methods for CNC milling machines and machining centers based on their processing characteristics so that they can fully exploit their processing potential.
Fixture design utilizes multiple workpieces in a single clamping.
The CNC milling machine uses compressed air as the driving force, loosening, and clamping tool. It is easy to manually change the tool, while the machining center can realize automatic tool change.
Processing tool change can realize the sequential processing of various surfaces.
Still, each tool change is more time-consuming, especially the automatic one, which sometimes fails (machining centers, most of the failures in the automatic tool change system).
Therefore, to meet the processing requirements, reducing the number of tool changes can save auxiliary time and improve the reliability of CNC machine tools.
Reasonable fixture design
This paper demonstrates how a reasonable fixture design (such as clamping multiple workpieces) can minimize the number of tool changes by properly adjusting the process.
Such as the workpiece shown in Figure 1, to complete the vertical machining centers to expand, reaming hole a and hole b original fixture design each time the clamping of 1 workpiece, the machining process for change hole a reaming cutter, reaming a → change hole b reaming cutter reaming b → change hole a reamer a → change hole b reamer b.
CNC milling machines and machining centers have transformed traditional machining by improving workpiece processing efficiency, precision, and adaptability.

Fig1 Workpiece
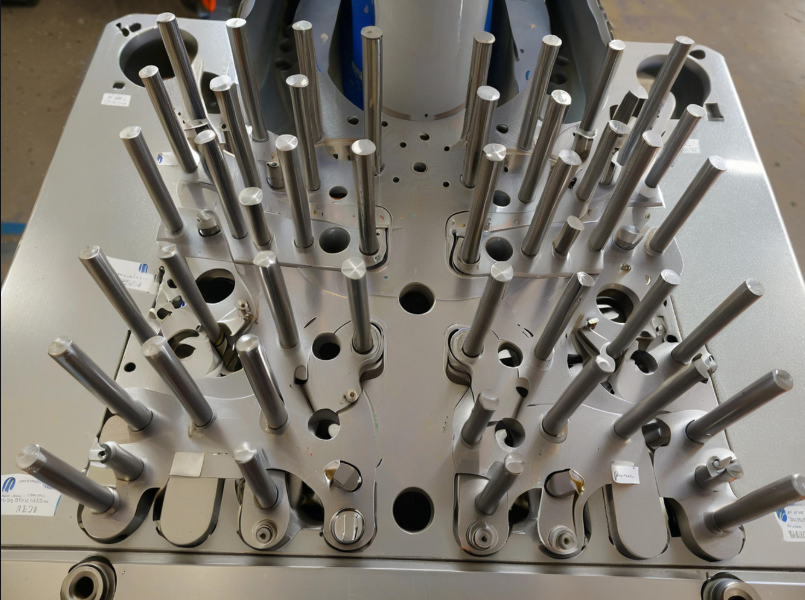
Now, according to the dimensions of the workpiece and machine travel, the fixture design for each clamping eight workpieces, as shown in Figure 2, the process is as follows: Change the hole a reaming cutter to expand the workpiece 1 ~ workpiece 8 of the hole a → change hole b reaming cutter, to expand the workpiece 1 ~ workpiece 8 of the hole b → change hole a reamer, to ream the workpiece 1 ~ workpiece 8 of the hole a → change hole b reamer, to ream the workpiece 1 ~ workpiece 8 of the hole b.

Fig.2 Clamping 8 workpieces at a time.
The machining process shows that machining 8 workpieces requires only 4 tool changes, saving significant auxiliary time compared to machine table movement time.
Multi-piece clamping fixture design points
1. Reasonable arrangement of workpieces
According to the dimensions of the workpiece, the size of the machine table, machine travel, and production batch determines the number of workpieces clamped each time and layout.
The distance between the workpiece should be appropriate, such as Figure 2 to take the appropriate distance between the workpiece m and n to load and unload the workpiece and remove chips.
In addition, the openness of the workpiece after installation should be good to realize the process of centralized machining.
2. The distance between each group of positioning elements should be accurate
Figure 3 displays the distance between positioning elements. The fixture uses two pins on one side for positioning.
The distances between cylindrical and diamond-shaped pins in each positioning group are based on the workpiece dimensions.
3. Reasonable clamping
Clamping elements are as simple as possible, so the tool movement has more safety space.
To reduce the number of clamping elements, consider linkage clamping and realize simultaneous clamping of multiple workpieces.
As shown in Fig. 3, each platen clamps two workpieces simultaneously.
Due to the CNC milling machine’s more centralized processing, roughing and finishing are sometimes difficult to separate, so the clamping force is large.
This is easy to leave the pressure plate indentation on the surface of the workpiece.
A simple and effective solution is to solder a copper layer on the pressure plate’s part in contact with the workpiece, as shown in Figure 4.

Fig. 3 Distance between positioning elements

Fig.4 Platen Soldering Copper
4. Vertical CNC milling machine fixture design
In vertical CNC milling machine processing, metal chips easily fall on the workpiece and fixture.
When designing fixtures, special consideration should be given to chip removal, which is particularly important for centralized continuous processing of machining centers.
Effective chip removal should prevent chips from interfering with tool cutting automatically.
Chips should avoid falling on fixture positioning elements, ensuring accurate positioning.
Cutting fluid should flush and carry away chips easily, while compressed air should blow chips off efficiently.
5. Fixture design for horizontal CNC milling machine
A horizontal CNC milling machine or machining center generally has an indexing table (or rotary table). In machining, the fixture should also rotate with the table.
The design of a multi-piece clamping fixture should ensure that the workpiece is in the position of the same machining elements before and after the rotary and can be accurately coincidentally (see examples).
A fixture as close as possible to the edge of the table so that the distance between the workpiece and the spindle taper hole end face is small, which is conducive to reducing the length of the tool holder but also conducive to chip removal.
Example of Multi-Part Clamping Fixture Design
This fixture is used on a horizontal machining center to machine the workpiece shown in Figure 5, which has 2 end faces and 2 coaxial holes.

Fig. 5 Workpiece 2
1. Workpiece processing requirements
The workpieces’ Faces C, D, and hole 2-ϕ15H7 ( 0+0.018 ) have already been machined. This process involves milling faces A and B, reaming, and boring coaxial holes 1 and 2.
Because of the small diameters of the holes in the middle of coaxial holes 1 and 2, machining needs to be done from both ends.
2. Clamp Functions
The workpiece face C (D) and hole 2-ϕ15H7 ( 0+0.018 ) are selected as the locating datum, and the fixture uses two pins on one side (a cylindrical pin and a rhombic pin) to locate the workpiece.
Through the clever design of the fixture, a set of fixtures can be used in the same process to complete the processing of the workpiece and can install six workpieces at a time. The horizontal machining center fixture is shown in Figure 6.
3. Machining process with fixtures
When the workpiece is mounted, face C is in contact with the fixture-locating surface. Now, the face A on the workpiece is located at the edge of the fixture.
The machining process is: milling is located in the fixture Ⅰ —Ⅰ edge of the workpiece face A → proceed in sequence, expanding, boring the workpiece with the coaxial of hole 1 and hole 2, in which the length of the central hole should be processed more than half the size of the hole(the length of the small hole in the middle should be processed more than half).
The table turns 180°. Currently, the fixture Ⅰ – Ⅰ and Ⅱ – Ⅱ side of the interchange, Ⅱ – Ⅱ side to reach the processing area.
After rotation, the workpiece’s end faces and the positions of coaxial holes 1 and 2 are the same as before rotation.
Next, the face A of each workpiece on the II-II side of the fixture and the coaxial holes 1 and 2 are machined, with half of the length of the small hole in the center being machined.
This completes the machining of face A and the hole from the end of face A.
Release the workpiece and turn it over by 180°. Face D of the workpiece is now in contact with the fixture locating surface, face B, at the edge of the fixture.
Next, face B and the hole from face B are machined.
The table is turned 180° in the same way as before. The small hole in the center should be connected to the previously machined part.
4. Key points of fixture design
1) Set up the rotary center and side alignment datum.
The rotary center of this fixture is ϕ30H5 hole, when installing, ϕ30H5 hole coincides with the rotary center of the indexing table.
Select the long side of the fixture with high precision as the calibration reference when the fixture is installed.
2) Determine the position of the cylindrical pin and rhombic pin.
The cylindrical pin and rhombic pin position determine the workpiece’s position in the fixture. Workpiece installation must meet the following requirements:
(1) The hole’s center to the rotation distance’s center should be symmetrical and consistent.
Such Figure 6, the distance was X1 、X2、X3.
(2) the processing end face (hole end face) to the center of rotation distance should be symmetrical and consistent. As in Figure 6, the distance at the same time for.
This makes the corresponding point on the workpiece to the center of the rotary distance equal, such as in Figure 6, two dimensions l.
This ensures that the table rotates 180 °, the workpiece is in the position of holes 1 and 2, and the end face and rotary before the complete coincidence (one of the benefits is to facilitate the preparation of CNC programming and call subroutines).
Design the diamond pin position using the appropriate cylindrical pin to meet the above requirements.
As seen in Figure 6, the distance from the locating pin to the center of rotation in the X and Y directions is marked with tolerances to meet these requirements.

Fig. 6 Horizontal machining center fixture
3) The edge of the workpiece extends beyond the edge of the fixture.
As shown in Fig. 6, it extends 4mm in the Y-direction to facilitate the machining of the end face and the removal of chips.
5. Clamp positioning accuracy analysis
This process is part of the processing requirements, as shown in Figure 5 (the requirements of this process are not high due to the subsequent rigid boring and reaming process and floating grinding process).
The diameter of the two positioning holes is ϕ15H7 ( 0+0.018 ), the center distance is 140±0.03, the center distance of the two pins is 140±0.01, the diameter of the cylindrical pin is ϕ15 -0.014-0.006, and the diameter of the rhombic pin is ϕ15-0.023-0.015, as shown in Fig.6.
As shown in Fig.5, among the process dimensions, the hole diameter dimension (not shown) is guaranteed by the fixed-size tool, which is not affected by the fixture positioning accuracy.
The hole depth size (not shown) and end face dimensions are low-precision and have no tolerance, and fixture positioning accuracy has little effect on them.
Now, analyze the fixture positioning error on the process sizes of 35 ± 0.1 and 85 ± 0.15.
1)Positioning error on the size of 35 ± 0.1. Positioning error ΔD, including datum non-coincidence error ΔB and datum displacement error ΔY.
Dimension 35 ± 0.1 of the process reference and positioning reference coincide, so ΔB =0.
Reference displacement error on the size of 35 ± 0.1 of the impact of the following three factors is analyzed as follows.

Fig. 7 Datum displacement for the positioning of a cylindrical pin and a rhombic pin
(1) Due to the positioning pin and positioning holes between the existence of clearance, the benchmark displacement results in the benchmark displacement error.
The cylindrical pin and rhombic pin positioning of the benchmark displacement shown in Figure 7 consider the extreme case, with the cylindrical pin at the existence of the maximum gap X1max and the rhombic pin at the existence of the maximum gap X2max, respectively.

Where:
D1max with the cylindrical pin with the maximum diameter of the workpiece hole, D1max =15+0.018; D2max with the rhombic pin with the maximum diameter of the workpiece hole, D2max =15+0.018; d1min for the minimum diameter of the cylindrical pin, d1min =15-0.014; d2min for the minimum diameter of the rhombus pin,d2min=15—0.023; X1max is the maximum clearance at the cylindrical pin, X1max =(15+0.018)—(15—0.014)=0.032; X2max is the maximum clearance at the rhombic pin, X2max =(15+0.018)—(15—0.023)=0.041.
In the dimension 35±0.1 direction, the existing maximum clearance results in a reference displacement error ΔY.
The datum displacement error ΔY includes linear displacement error ΔY1 and angular displacement error ΔY2.
The linear displacement error ΔY1 is the maximum clearance between X1max and X2max The angular displacement error ΔY2 is caused by the corner error ± Δα: tan Δα = (X1max+ X2max )/(2L)Where: Δα for the corner error, can be deflected in both directions, so ± Δα; L for the center distance, L = 140.

Since the clearance at the rhombic pin is large, the resulting error is large, so calculate the datum displacement error at the rhombic pin. The datum displacement errors ΔY‘ are largest at face B on the workpiece near the end of the diamond pin:

Where:
ΔY‘ is the reference displacement error generated at face B, ΔY1 is the linear displacement error, at the rhombic pin, ΔY1 =X2max =0.041; ΔY2 is the angular displacement error, considering the deflection in both directions, at face B, ΔY2 = 2 L1 tan Δα; L1 is the distance from face B to the rhombic pin, L1= 15.
(2)Due to errors in the distance from the positioning pin to the center of the table rotary table 180 ° rotary table, positioning reference displacement (the program determines tool position, is unchanged), resulting in the benchmark displacement error o f ΔY“.
ΔY“ size for the positioning pin to the table rotary center of the size of the tolerance, as shown in Figure 6, X-direction size of the deviation of ± 0.01, so ΔY“ =0.02.

Fig. 8 Table rotation angle error generates datum displacement.
(3)due to the table rotary angle error, the rotation, positioning reference displacement, and the benchmark displacement error ΔY“‘.
Study and rotary center of the largest distance from the positioning pin.
Figure 6 shows the center of the rotary X direction of the largest size, 215, and the Y direction, 165. Now, the table rotary error for ±2“.
Table rotary angle error generated benchmark displacement shown in Figure 8, after the ideal position in the rotary pointO, the maximum deviation from the position in the pointO′and pointO″.
Benchmark displacement error ΔY“ forO′O″ in the 35±0∙1. The square direction of the projection, that is, theO′Nof the Length.

The reference displacement error ΔY that affects dimension 35 ± 0.1 is the sum of the reference displacement errors from the three factors:

This error ΔD, which affects dimension 35 ± 0.1, is the sum of the datum non-recombination error ΔB and the datum displacement error ΔY :
![]()
The error ΔD is calculated to be approximately 1/3 of the 35 ± 0.1 tolerance of the process dimension, which meets the requirements.
The positioning error is calculated by analyzing the geometrical relationships. An accurate drawing can also be obtained using CAD software.
2) The effect of positioning error on dimension 85 ± 0.1 is similar to that on 35 ± 0.1.
Conclusion
The fixture design of the CNC milling machine is different from that of the traditional fixture design.
According to the processing characteristics of the CNC milling machine and machining center, reasonable design fixtures try to clamp multiple workpieces to fully utilize the machine tool’s processing potential.