Table of Contents
The toolset is a key step before the CNC turns off parts. Accurate and fast tool-setting methods are an important prerequisite for ensuring the precision and efficiency of CNC turning. Taking external and internal contour tools in CNC turning as examples, this article explores tool setting methods using virtual simulation software, offering a theoretical and simulation reference for CNC turning operators.
The CNC lathe processes parts by creating a processing plan based on the part drawing and then generating the corresponding CNC program to control the machine’s movements.
The CNC program is compiled based on the node coordinates from the part drawing, determined by the workpiece coordinate system and corresponding tool orientation.
Establishing the workpiece coordinate system on a CNC lathe directly impacts part accuracy and efficiency. This article explores common tool setting methods for shaft parts using outer and inner contour tools, demonstrated through CNC simulation software.
Tool setting method for external contour tools
Common tools for machining shaft external contours include turning, grooving, and threading tools. Tool setting is usually done by trial cutting, which is quick and doesn’t require additional tooling.
1. External turning tool setting
(1)Selecting the Workpiece and Tool for Trial Cutting
There are various external turning tools, including straight, 45° elbow, and 90° elbow tools. For example, in the Swan CNC simulation software, select 08F low-carbon steel (FANUC0iT default material) as the blank material.
(2)Performing the Trial Cutting
The turning tool sets the workpiece origin at the center of its right end face, with the Z axis as the axial direction and the X axis as the radial direction. Before trial cutting with the external turning tool (T01), start the spindle, enter “M03S300” in [MDI] mode, and execute (Figure 1a). Then, manually feed the tool to cut the right end face (Figure 1b).
(3)Defining the Z Coordinate and Completing Tool Setting
Open the [OFFSET SETTING] function on the control panel. In the [TOOL COMPENSATION/GEOMETRY] interface, set the tool’s current Z position to “Z0” (Figure 2a). Click the gray square button under [MEASURE] to display the result (Figure 2b). The Z-axis setting for the external cylindrical turning tool is now complete.
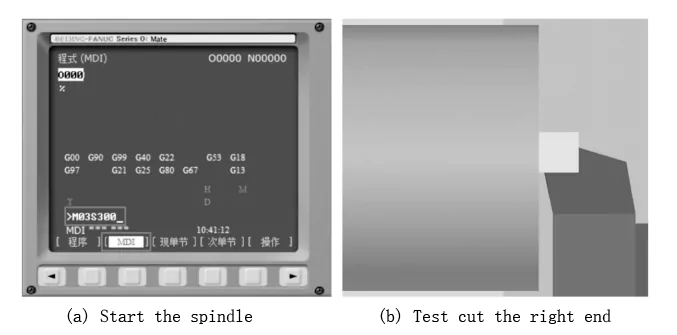
Figure 1 Z-axis tool setting
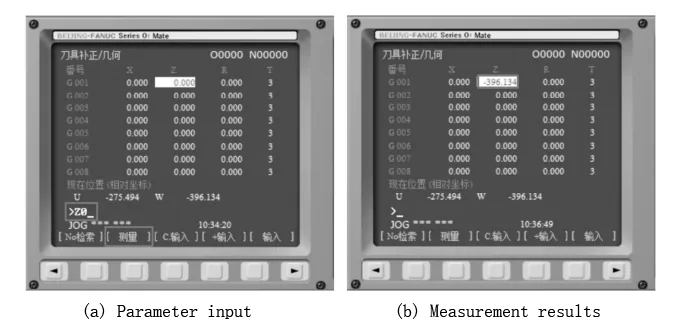
Figure 2 Z-axis tool setting parameter settings
(4)Tool Retracts and X-Axis Trial Cutting Positioning
The tool retracts in the +X direction for X-axis trial cutting positioning (Figure 3a), then advances in the -Z direction to complete the outer circle trial cutting (Figure 3b).
(5) Measurement of Outer Circle Diameter After Trial Cutting
After the outer circle trial cut, retract the tool along the +Z direction (Fig. 4a), stop the spindle, open the [Workpiece Measurement] command, and use a vernier caliper to measure the outer circle diameter (Figure. 4b).
(6)Tool Compensation and Geometry Adjustment
Open the [Tool Compensation/Geometry] interface, set the tool’s X coordinate to the measured outer diameter (Figure 4b), and enter “X79.482” (Figure 5a). Click the gray square button under [Measure] to get the result (Figure 5b).
The external turning tool alignment is completed at this point, and the tool holder performs the [Return to Origin] operation.
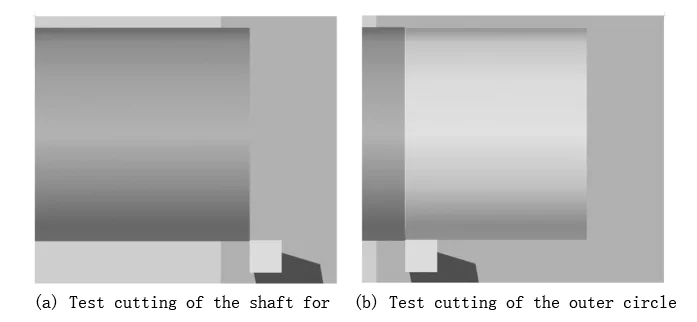
Figure 3 X-axis test cutting and tool setting
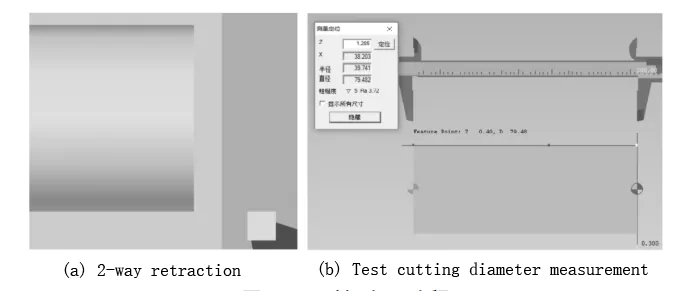
Figure 4 X-axis tool setting process
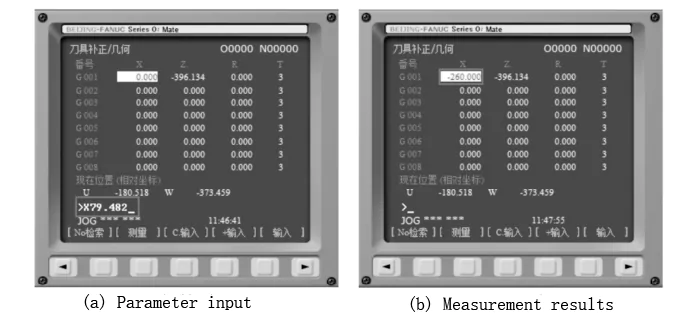
Figure 5 X-axis tool setting parameter settings
2. External grooving tool alignment
Turn the tool holder clockwise to turn the external grooving tool (T02) to the processing position. The external grooving tool is also aligned by trial cutting the end face and the outer circle.
Start the spindle, move the tool holder, and lightly touch the external grooving tool’s blade to the workpiece end face (Figure 6a). Keep the tool still, open the parameter settings, select position [002] under [Number], and enter “Z0” for [Measurement] (Figure 6b).
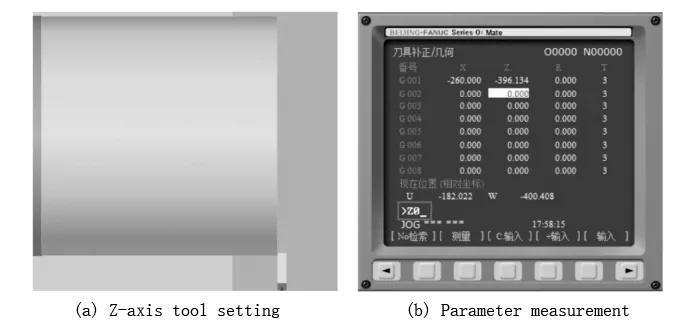
Figure 6 External grooving tool Z-axis tool setting
Adjust the tool position and let the external grooving tool test cut the outer circle, as shown in Figure 7(a). Withdraw the tool in the +Z direction, stop the spindle, measure the outer circle diameter, and input the data (“X79.130”) as shown in Figure 7(b). Click the gray square button under [Measure]. The external grooving tool is now set, and the tool holder performs [Return to Origin].
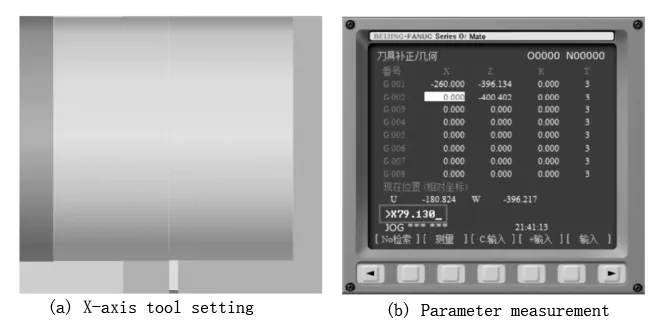
Figure 7 External grooving to cool X-axis tool alignment
3. External thread cutter alignment
Turn the tool holder clockwise, move the external thread cutter (T03) to the processing position, and reduce the feed speed as the cutter approaches the workpiece. When the cutter tip is flush with the workpiece end (Figure 8a), pause the feed. Open the parameter settings, select [003] under [number], and assign the current position to “Z0” for [measurement].
In manual feed mode, fine-tune the tool position until the external thread cutter lightly touches the outer cylindrical surface (Figure 8b). Set this position as the workpiece diameter after the 1.2 external grooving cutter (T02) attempted cutting. The cutter is now aligned, and the tool holder should [return to origin].
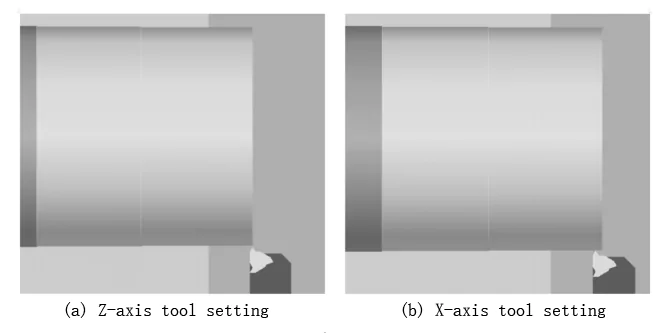
Figure 8 External thread cutter setting
The above is the tool setting process of the external contour machining tools commonly used for shaft parts.
Tool setting method for inner contour tool
Common tools for inner contour machining of shafts include inner hole turning, grooving, and threading tools. Tool setting also establishes the workpiece coordinate system origin at the center point of the right end face.
1. Internal hole turning tool setting
An internal hole-turning tool (T01) is commonly known as a “boring tool”. Before boring tool setting, the drill has completed the center hole drilling process.
Open the [Quick Positioning] under [Machine Tool Operation] in the main menu, select the workpiece center, click [OK], and obtain the processing window (Figure 9a). Then, open [Tool Correction/Geometry], set the boring tool’s current position to “X0,” and perform the [Measurement]. The result is shown in Figure 9 (b).
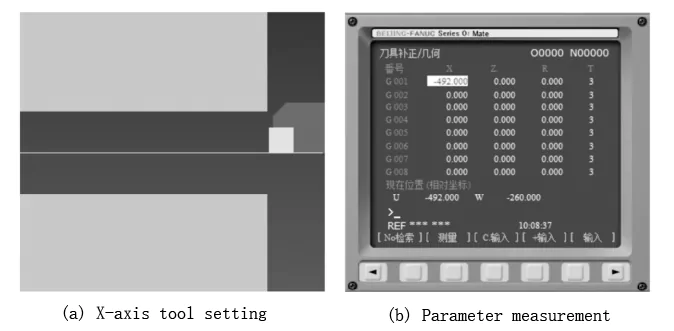
Figure 9 Boring tool X-axis tool setting
Fine-tune the boring tool to lightly touch the right end face of the workpiece (Figure 10a). Open the parameter setting interface, set the current position to “Z0,” and measure, as shown in Figure 10b. The boring tool is now set, and the tool holder must return to its rigin.
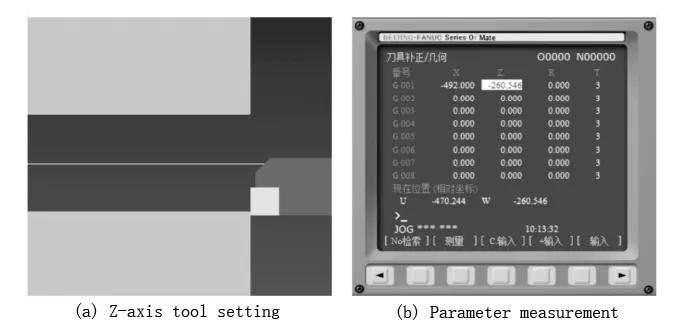
Figure 10 Boring cutter Z-axis tool alignment
2. Internal grooving tool alignment
Turn the tool holder clockwise to move the internal grooving tool (T02) to the processing position. After starting the spindle, use the [Fast Positioning] command to move it quickly to the center of the right end face, as shown in Figure 11 (a), then set the current position to “X0” in [Number] [002] of the [Tool Compensation/Geometry] interface and measure.
Move the internal grooving tool slightly so that it touches the right end face of the workpiece (Figure 11b), set the current position to “Z0,” and measure. The tool alignment is complete, and the tool holder should then perform the [Return to Origin] operation.
3. Internal thread cutter tool setting
Turn the tool holder clockwise to move the internal thread cutter (T03) to the processing position. After starting the spindle, use the [Quick Positioning] command to quickly move it to the center point of the right end face of the workpiece, as shown in Figure 12 (a). In the [Number] [003] of the [Tool Compensation/Geometry] interface, assign the current position to “X0” and measure it.
Align the internal thread cutter’s tip with the right end face of the workpiece, as shown in Figure 12 (b). Pause the feed, set the current position as “Z0” in [Number] [003] of the [Tool Compensation/Geometry] interface, and measure. Once aligned, perform the [Return to Origin] operation on the tool holder.
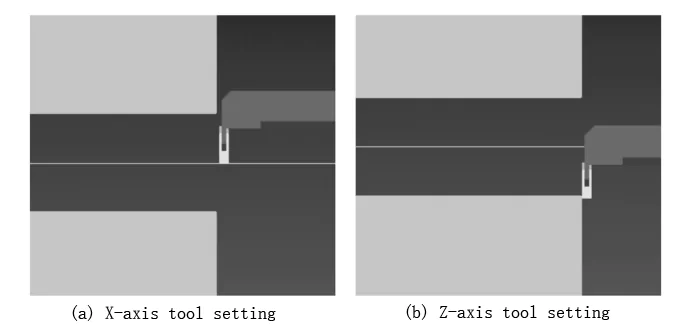
Figure 11 Internal grooving tool alignment
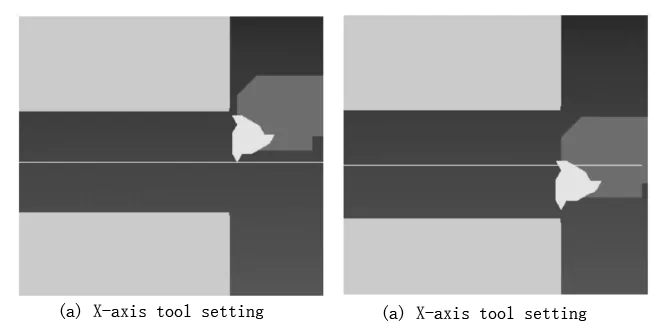
Figure 12 Internal thread cutter setting
The above is the tool setting process of the internal contour machining tools commonly used for shaft parts.
Conclusion
Before CNC turning, it is necessary to establish a workpiece coordinate system. The accuracy of setting the workpiece coordinate system is crucial for part processing accuracy and efficiency. This article explores tool setting methods, processes, and precautions for common external and internal contour turning tools used in shaft part processing, providing theoretical and simulation references for CNC turning operators.

